Cleaning is flute is a tricky job as the instrument has narrow openings and various notches on it. When it comes to cleaning a flute, it’s not just about dusting it; you can need to check for moisture inside it.
And, cleaning a flute requires some different supplies as the opening are smaller. Here, we will show how to clean a flute with an elaborated step-by-step guide. Before starting with the cleaning stages, we will give away the names for supplies.
Cleaning Supplies For Flute
- Cleaning rod
- Polishing gauze
- Cleaning paper
- Flute oil
- Oil tube
- Tissue Paper
- Silver cloth
- Tone hole cleaner
- Cleaning swabs
- Screwdriver
Steps for Cleaning Flute On A Daily Basis
We have divided the cleaning steps into two different stages. Let’s start with the first one.
Cleaning The Body Of Flute
As your fingers and lips will be thoroughly on the flute, you need to clean it an option. It’s best if you clean in after you finish playing. Also, you can clean it a little beat before planning too. Other than these two instances, you need to clean a flute when left unused a long period. However, we will be focusing on both the inner and upper surface of the flute in this stage.
Step 1
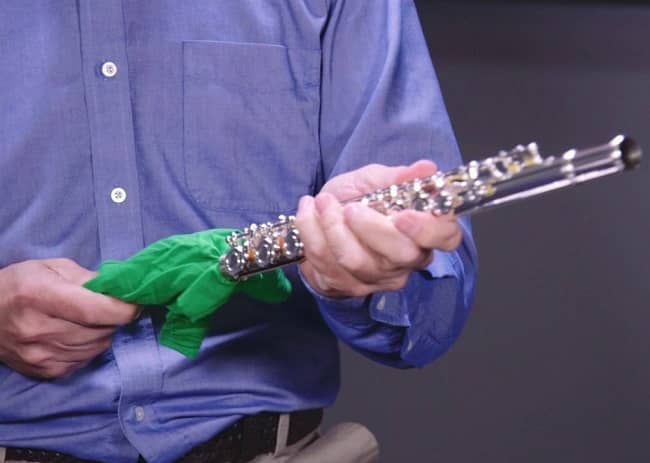
Take the cleaning rod and polishing gauze. Grab the polishing gauze by a corner. Then, pass the corner through the opening end of the cleaning rod. When you pass the gauze through the leaning rod, it holds the gauze and cleans the inside of the flute.
Step 3
When the polishing gauze is into the cleaning rod, you need to wrap the gauze coving the cleaning completely. Make sure the opening end of the cleaning rod is not exposed by any chance. If it’s not covered properly, it will scrape the inside wall of the flute.
Step 4
Once the cleaning rod is wrapped properly, you can put it inside the flute. You can’t turn in any direction you want to clean inside the flute since the space is narrow. You need to turn the rod in the direction you wrapped the polishing gauze.
This way, if there’s any moisture, dust, and lint, everything will be cleaned. When you are done cleaning the inside, you can take out the rod from the flute.
Step 5
When you are done cleaning the inside, you can start cleaning the upper area of a flute. You can use the same polishing gauze or get another one to clean the outside of a flute. Take the polishing gauze and wrap it onto your one or two fingers. The number of fingers depending on the area you are cleaning of a flute.
Step 6
Now, run the body of the flute smoothly to clear dust, finger marks, and moisture. Use one finger where space is confider, and use two if a space you are cleaning is relatively dispersed.
Upper and inner body cleaning process are done. Now, we will move onto the next stage of cleaning a flute.
Cleaning The Pads
As you play the flute by moving fingers on the pads, the moisture can get stuck in the pads and finger holes. Also, when you leave a flute unused for a while dust can get stuck in the pads. Let’s see how to clean the pads.
Step 1
Take a cleaning card, and place it under a pad. Then, press the key in order to clean it. Don’t move the card back and forth. Simply, press the key 3 to 4 times, and it will be cleaned.
Step 2
When you are done cleaning under the pads and tone holes, you need to the space between them. Place the card between pads and moving it back and forth carefully, this way if there are dust and damp, those are thoroughly cleaned.
Here, we are done with the daily cleaning process of the flute. Let’s have a look at the steps for the monthly cleaning process.
Steps For Cleaning A Flute Monthly
We already mentioned a few time on the daily cleaning process, when a flute is left unused, you need to clean it before playing. You can attempt cleaning an unused flute the way we explain in the preceding sections. But, theirs is more to it. You can apply the following steps for both cleanings used a flute and a flute that you always. But, make sure to perform the dusting, removing moisture from the flute before starting the steps for monthly cleaning.
Step 1
You need to start will inspecting the screws of the flute. They can be loosened after a prolonged time to playing the flute. So, check the screw carefully and tighten the loose screws. This step is crucial as it has a contribution in the flute creating mind-blowing tunes.
Step 2
You need to oil the moving parts of the flute to keep them lubricated. Otherwise, while you press the keys, they will be stiffed, and you won’t be able to play the flute properly.
Anyway, to apply oil, use a tube. And, put a very small amount of oil in the parts. Don’t apply too much oil, and it’s a waste. Also, it will get onto your hand while playing the flute.
Step 3
Once you are done oiling the parts, you can wipe the oil left on the surface of the flute and move on to the next step.
Step 4
The joints of the flute are also needed to be cleaned. You can use a silver cloth to clean the joints. Please don’t use any grease because it will cause the joints to get stuck. And, it may result in its more severe issues.
Step 5
Finally, you need to clean the tone hole. So, take the tone hole clearer bar and clean them.
Cleaning the Head Joints, Body Joints, & Foot Joints
You can clean the foot and body joints by using cleaning swab, but you can clean the head joint with a swab. In that case, you can unscrew the head joint and open the parts to clean them.
On A Final Note
We hope you have got a clear idea about the cleaning you flute. Note that, this guide is mainly for flute made of metals. Anyway, go step by step to get it clean properly. And your flute will look shiny and clean! We wish you all the best to play it with extra motivation.
Leave a Reply