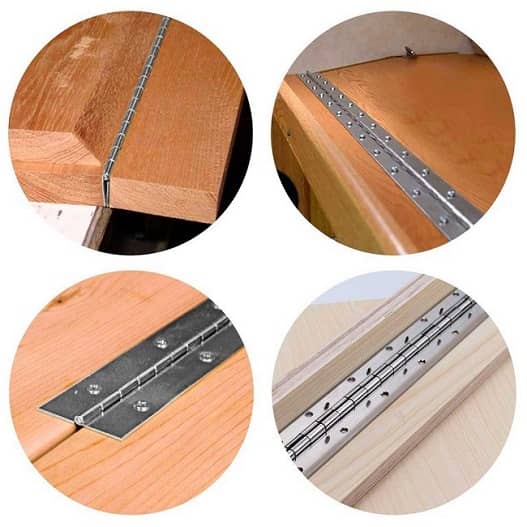
Piano hinges are a typical musical instrument tool. People use them for piano lids, box lids, shed doors, prison doors, ship tools, and many more. They are nothing but a longer and stronger version of the traditional hinge.
They sit along the full length of a surface where a regular hinge covers a few areas. These hinges are available in a variety of materials such as steel, aluminum, brass, stainless steel, etc.
Their lengths, thickness, and widths also vary based on the brands. Before jumping to the step-by-step installation guide, let’s have a look at their benefits.
PROS OF PIANO HINGE
- They are capable of holding up to a lot of weight. Besides, they ensure even load distribution. There is less risk of breaking or damaging. Hence, your project will be long-lasting and sturdy.
- Manufacturers can add many features to a piano hinge like self-opening function, water resistance, salt tolerance, etc.
- Using a few small hinges can make the lid twist. With a piano hinge, you will no longer face this issue.
- The best thing about a piano hinge is that it has a customizable length. We can use the same hinge for several purposes and make the adjustments as per need.
However, we noticed some drawbacks as well. Metal hinges corrode quickly. They are more susceptible to rusting in the presence of moisture. The majority of them feature small screws, which are not suitable for heavy-duty projects. So, prioritize purchasing stainless steel with bigger screws.
INSTALLING A PIANO HINGE
Things you’ll need
Collect all tools before starting the work. You should gather the following items:
- Box and lid
- Piano hinge
- Scale
- Tin snips/ hacksaw
- Markers/ pencils
- Hand file
- Chisel
- Drill machine
- Screwdriver
Step 1: Make sure that the piano hinge is not too short or too long for your box
The standard lengths of a piano hinge usually range from 12 to 72 inches. Some are even longer. However, people can trim a hinge to whatever size the project needs. Measure the box’s width with a scale. Mark the same length on the hinge.
Pay attention to the screw holes’ locations. You should not trim halfway through a hole because it will look awful. Trim from both ends if necessary. Take your tin snips, open the hinge up, cut the sides first, and then the middle section. Another option is, separate the extra portion using a hacksaw. It gives a comparatively straight cut.
Step 2: File down the rough edges
Cutting a hinge may result in some rough edges. They can damage your box. Therefore, it is mandatory to smoothen the sides. Rub your hand file against the edge. Keep pushing forward and lifting a couple of times rather than continuous back-and-forth motions. Clean up the debris. Now your hinge is prepared to sit between the box and lid.
Step 3: Cut out of the installation side
If you attach the hinge directly, a gap will arrive between the lid and box. It is not acceptable at all. In such a case, you have to cut the box’s side. Open the hinge, place it on the side you need to install it, and outline with a pencil. Now, you have to measure the hinge’s depth and chisel a slightly bigger portion from the marked rectangle. A chisel is excellent for this job.
Step 4: Make all screw holes
Position the hinge on the chiseled section. Mark the center of the screw holes on the box. Drill pilot holes according to the screw’s dimension. Do the same on the lid. Be sure to drill on the inner side of the lid.
Step 5: Add the screws
It’s time to attach the screws. We suggest adding only two screws temporarily to check whether the finishing looks okay or not. Try opening and closing the lid. There should not be any gap after closing the box. If everything is fine, you can add the rest of the screws with the help of a screwdriver.
Congratulations! You have installed a piano hinge successfully.
Leave a Reply